MDSplus Traverser
Overview of Traverser
Traverser is an application for the display and modification of MDSPlus trees. It presents a graphical view of the TREE hierarchy and a set of command buttons to manipulate it.
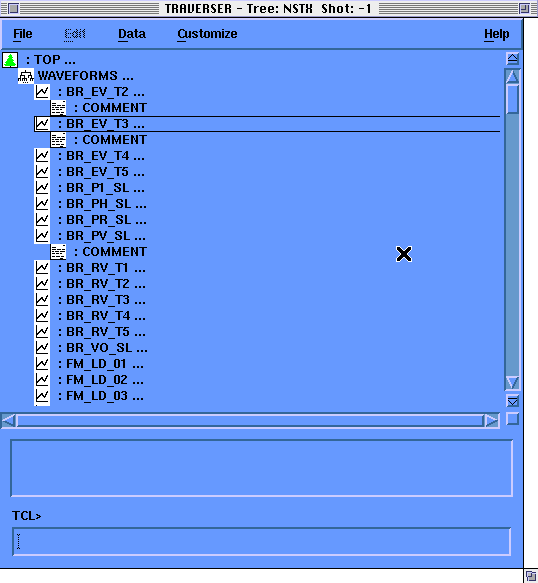
The Traverser is divided into two main sections. In the top part of the window a picture of some or all of the tree hierarchy is presented. In the bottom section is a command widget which will accept TCL commands.
Figure 1. Traverser Main Window.
To use Traverser at PPPL on either the VMS, Unix, or Petrel clusters, set up the MDS definitions:
setup mdsplus
and invoke traverser at an X-terminal (or on a Mac via eXodus or Mac-X):
On VMS:
   $ traverser -tree nstx -shot 108880

   or

   $ traverser  (and enter the tree and shot in the pop-up widget)
If you get a message similar to "Can't open Display" you need to set your DISPLAY variable to you TCP/IP number or name:
$ set_display <your IP address>On Unix:
   % traverser -tree nstx -shot 108880 &

   or

   % traverser &
If you get a message similar to "Can't open Display" you need to set your DISPLAY variable to you TCP/IP number or name:
% setenv DISPLAY <your IP address>Note that you usually will NOT have to set your DISPLAY variable when you have logged into an X-terminal (or emulator), or used ssh to create new windows.
1 Main Window
The main section of the TRAVERSER is used to display the hierarchy of the currently open tree. It can be displayed in a variety of ways controlled by the Customize menu.
There are three parts to the screen representation of a node in the traverser. On the left is an icon representing the usage of the node. This is followed by the node name which will begin with a ':' if the node is a member. Finally, if the node has descendents there will be '...' following the name.
Members are always displayed above (or to the right) of children in the traverser.
1.1 Selecting Nodes
TRAVERSER maintains a list of 'selected' nodes which the items in the menus will operate on. They are distinguished from unselected nodes by being displayed in reverse video.
Selecting nodes has two functions:
1 - To specify which nodes the functions in the menus in the menu bar will operate on. For example, after selecting a few nodes in the main window, the Display Data button in the Data menu will bring up windows with the contents of those nodes disp layed.
2 - To paste full node specifications into other applications like the scope, pad, or any text based application.
To select one node click the left mouse button on the node in the main TRAVERSER part of the window. The node will be highlighted in reverse video, all previously selected nodes will become unselected, and this node will become the target of the ope rations in the menus.
To select more than one node either:
Drag the mouse with the left mouse button over all of the nodes to be selected. They will all highlight etc... or
Select one node and then extend the selection by clickinG on additional nodes while holding the shift key down.
1.2 Opening / Closing Nodes
Double clicking left on a node which has descendents will open it if it is closed or close it if it is open. To see the members and children of a node double click left on the node. To remove them from the display double click left on it again.
1.3 Dragging Nodes
Nodes can be renamed by dragging them using the middle mouse button.
This feature is only available if the tree is open for edit.
If the mouse is over a selected node then all of the selected nodes will be renamed. Otherwise only the node under the mouse will be moved.
CAUTION: drag the node(s) to the new parent node as opposed to where it will appear on the screen after it is renamed.
1.4 Right Button Menu
There is a menu under the right mouse button in the main window of the traverser. Its contents depend on whether or not there is a tree open and if it is open for edit or not.
The items in this menu which are node specific will operate on the node which is under the mouse at the time them right button is depressed.
This menu always contains the items in the File menu. If there is a tree open it will also contain the buttons in the Data menu. If the tree is open for edit it will contain the buttons from the Edit menu.
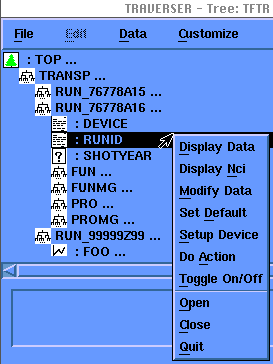
Figure 2. The Right-button (mouse-button 3) short-cut menu.
2 Traverser Menus
The main window menu bar contains the names of menus from which you can choose to accomplish various tasks. Many of the commands available from the menu bar are also accessible by right-clicking (mouse-button 3) in the main window with a tree node se lected.
2.1 The File menu
The items on the File menu let you open and close trees and exit the application. For information about these functions double click on one of the additional topics listed below.
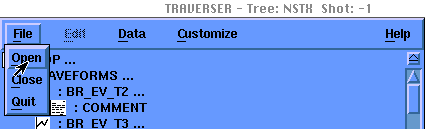
Figure 3. The File Menu.
2.1.1 File Open
Choose Open from the main window's file menu to open a tree. A dialog box will appear on the screen to allow you to specify the tree and shot to open.
Note: The Open item is used for both open and open /edit in TRAVERSER. There is a toggle button on the open box which allows you to specify which kind of open you want.
2.1.1.1 Open Box
This dialog is used to specify the tree and shot to open and if it should be opened Edit or not. Type the name of the tree in the field labeled "Tree" and a shot number in the field labeled "Shot".
Do not open trees for edit unless you need to modify the structure of the tree (i.e. add node, add device, rename node, and tag operations) When a tree is opened for edit you must get exclusive access to it, which locks out other users from using this tree.
Shot -1 is the model file. All changes to parameters should be made in the model and will be propagated to the next shot.
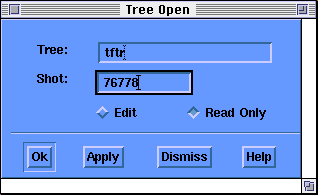
Figure 4. Open a new tree for editing or read-only.
2.1.2 File Close
Choose Close from the main window's file menu to close an open tree.
MDSPlus maintains a stack of open trees. When you choose close from the file menu the top tree on this stack is closed. If there are any other trees on the stack, the top one of these will become the currently open tree.
If the tree was open for edit, and was modified, a question box will appear to ask you if you want to save the changes. See Close Box from the additional topics below.
2.1.2.1 Close Box
This dialog is prompting to see if you want to write out the changes to a tree you have open for edit. All non structural changes (i.e. modifying the contents, on-off status etc...) are done when the operations are performed. Structural changes must be explicitly saved using the"Write" button from this dialog.
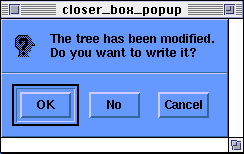
Figure 5. Close Box appears if a change has not been saved before Closing a tree.
2.1.3 File Quit
Choose Quit from the file menu to exit TRAVERSER. This will close all of the open trees and exit.
If any of the trees are open for edit and have been modified you will be prompted to to Write them, close them, or cancel.
Choosing cancel will abort the quit operation and TRAVERSER will remain running.
2.1.3.1 Exit Box
This dialog is prompting to see if you want to save the structural changes made to trees that were open for edit before exiting the application.
Choosing "Write First" will save the changes before exiting. "Close" will exit without saving the changes. "Cancel" will abort the exit operation. "Help" will display this text.

Figure 6. A warning box appears if a change has not been saved before Exiting program.
2.2 The Edit menu
The items on the Edit menu are used to make structural modifications to trees. This menu is only available if the tree is currently open for edit. For information about these functions double click on one of the additional topics listed below.
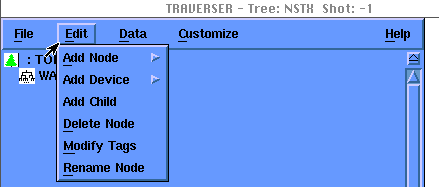
Figure 7. The Edit Menu.
2.2 1 Edit Add Node menu
The Add Node button in the Edit menu has a menu of node usages under it. To see the menu drag the mouse to the arrow on the right side of the button. A menu of node usages will appear. Choose the usage for the node you wish to add.
Note: Nodes are added as members of the currently selected node or the node which was under the mouse when the right button menu was brought up. Do not add nodes where you want them to appear in the structure. Instead add them to the parent of where you want them to appear.
A box asking for the node name will appear on the screen.
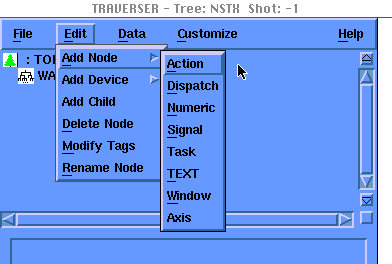
Figure 8. The Add Node Submenu.
2.2.1.1 Add Node Action
This button adds a node of usage ACTION to the tree. These nodes can be used to store descriptions of things to be done during the data acquisition cycle. They can also contain expressions which point to such nodes.
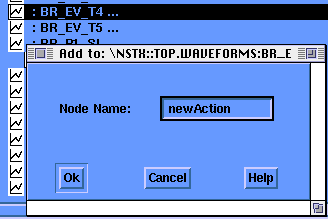
Figure 9. A typical "Add Node..." dialogue box.
2.2.1.2 Add Node Axis
This button adds a node of usage AXIS to the tree. These nodes can be used to store the descriptions independent parameters of signals. They can also contain expressions which point to such nodes.
2.2.1.3 Add Node Dispatch
This button adds a node of usage DISPATCH to the tree. These nodes can be used to store descriptions of things to be done during the data acquisition cycle. They can also contain expressions which point to such nodes.
2.2.1.4 Add Node Numeric
This button adds a node of usage NUMERIC to the tree. These nodes can be used to store numbers or arrays of numbers in the tree.
2.2.1.5 Add Node Signal
This button adds a node of usage SIGNAL to the tree. These nodes can be used to store things which are drawable. For example: signals, arrays, ...They can also contain expressions which point to such nodes.
2.2.1.6 Add Node Task
This button adds a node of usage TASK to the tree. These nodes can be used to store descriptions of things to be done during the data acquisition cycle. They can also contain expressions which point to such nodes.
2.2.1.7 Add Node Text
This button adds a node of usage TEXT to the tree. These nodes can be used to store things which are inherently textual. For example, comments, labels ... They can also contain expressions which point to such nodes.
2.2.1.8 Add Node Window
This button adds a node of usage WINDOW to the tree. These nodes can be used to store descriptions of the window of a dimension in the tree. A WINDOW specifies the part of an AXIS which is relevant for a DIMENSION. They can also contain expression s which point to such nodes.
2.2.2 Edit Add Device menu
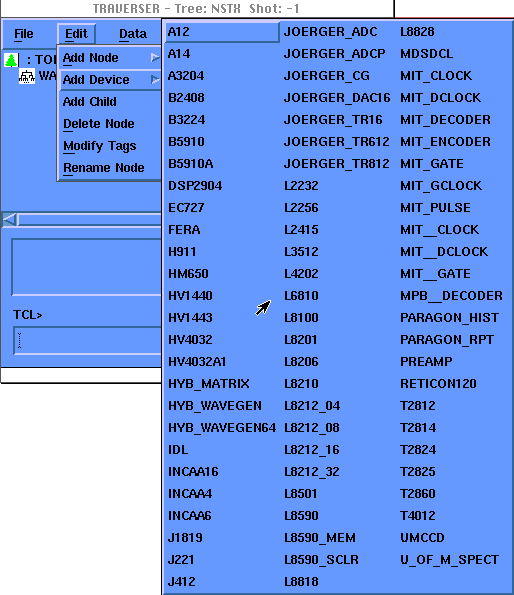
Figure 10. The Add Device submenu shows all supported modules.
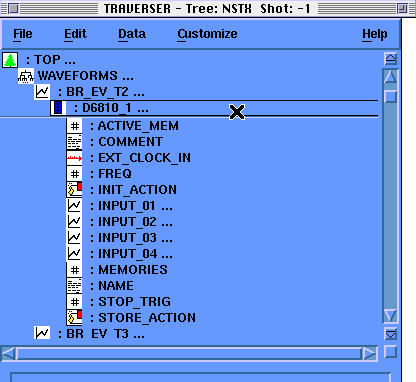
Figure 11. Nodes added automatically to support newly chosen device.
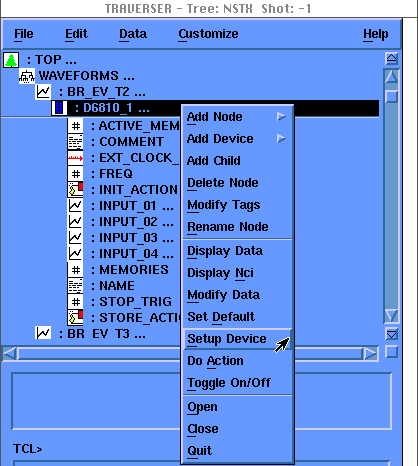
Figure 12. Accessing device setup parameter window.
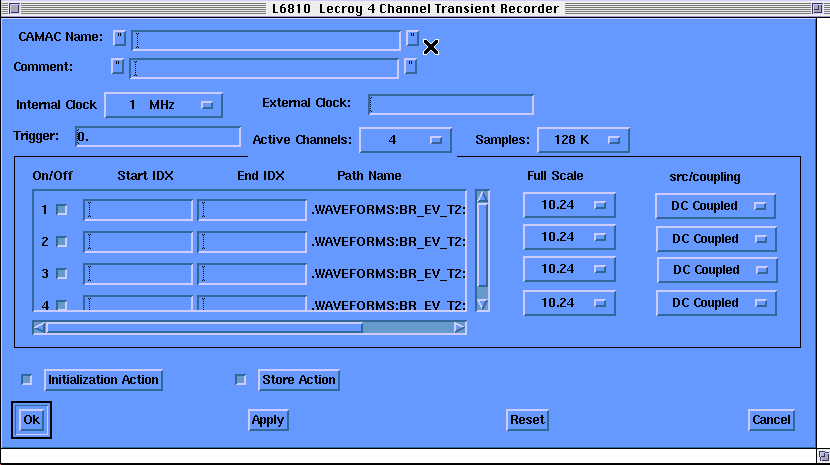
Figure 13. Device Setup window for 6810 CAMAC module.
The Add Device button in the Edit menu has a menu of the supported devices under it. To see the menu drag the mouse to the arrow on the right side of the button. A menu of node device types will appear (Fig. 10). Choose the device type you wish to a dd.
Note: Devices are added as members of the currently selected node or the node which was under the mouse when the right button menu was brought up. Do not add devices where you want them to appe ar in the structure. Instead add them to the parent of where you want them to appear.
A box asking for the node name will appear on the screen.
After adding a 6810 node (D6810_1 here) to the model tree, additional nodes for the necessary data 6810 CAMAC setup parameters appear in the tree structure (Fig. 11).
Choose Setup device from the Mouse Button 3 menu (Fig. 12), and reach the CAMAC parameter setting window for this device (Fig. 13).
2.2.3 Edit Add Child
The Add Child button in the Edit menu adds a child (as opposed to a member) to the currently selected node.
Note: Children are added to the currently selected node or the node which was under the mouse when the right button menu was brought up. Do not add children where you want them to appear in the structure. Instead add them to the parent of wher e you want them to appear.
A box asking for the node name will appear on the screen.
2.2.4 Edit Delete Node
The Delete node button in the Edit menu deletes nodes from the tree. If there are unselected nodes which will be deleted by the operation, a prompt will appear, asking if you are sure or if you want to see a complete list of the nodes.
2.2.5 Edit Modify Tags
The modify tags dialog is used to manage the tags of a node. The current list of the node's tags is displayed in the list box.
To add a new tag type the name (with no backslash) in the text field under the list box and then click the 'Add Tag' button.
To remove a tag click on the tag to be removed in the list box, this will highlight the that tag, then click on the the 'Remove Tag' button.
When you are satisfied with the list of tags click either Ok or Apply. To revert to the original tag list, before clicking Apply, click on either Cancel or Reset.
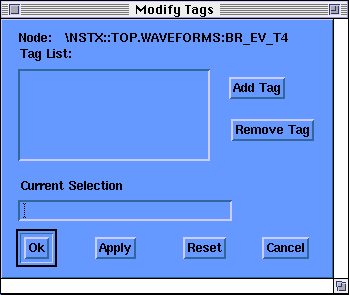
Figure 14. The Modify Tags dialog box.
2.2.6 Edit Rename Node
The Rename Node button in the Edit menu can be used to rename one or more nodes in the tree. It will prompt for new node names for the nodes being renamed.
Note: Nodes can also be renamed by dragging them in the main TRAVERSER window using the middle mouse button.
2.3 The Data menu
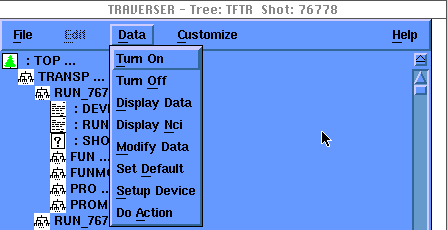
Figure 15. Commands in the Data Menu.
The items on the Data menu let you look at and change the contents and status of nodes in the tree.
The items in this menu operate on nodes which have been selected in the main TRAVERSER box with the left mouse button. For information about selecting nodes see "1.1 Selecting Nodes".
These are all non editing operations. They include: turning node on and off, displaying the contents of nodes, modifying the contents of nodes, setting up devices, etc...
2.3.1 Data Turn On / Off
Turn On and Turn Off change to ON/OFF status of a node and all of its descendents. These buttons will operate on all of the nodes which are selected.
In general, node / sub-trees which are off will not be processed by the data system. No actions will be scheduled if they are off. This can be used to disable either entire diagnostics or individual actions.
Nodes which are off are displayed in a thinner typeface so that they can be distinguished from ones that are on.To cancel the modification completely (again only before choosing Apply) use the Cancel button.
2.3.2 Data Display Data
Choose display data to display the contents of a node in the tree. This button will operate on either all of the selected nodes, or the node that was under the mouse when the right button option menu was brought up.
Display Data will create a window for each of the selected nodes. Use "Cancel" or "Ok" to dismiss these boxes.
The Data will not be modifiable. To change the data use "Modify Data".
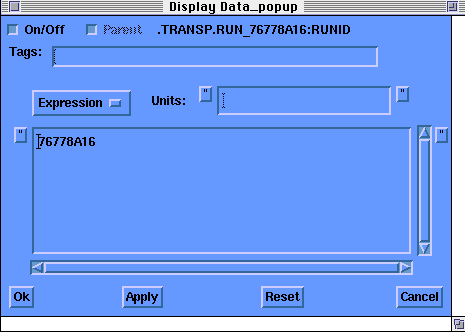
Figure 16. The Display Data pop-up does not permit editing.
2.3.3 Data Display NCI
Choose display nci to display information about nodes in the tree. This button will operate on either all of the selected nodes, or the node that was under the mouse when the right button option menu was brought up.
Display Nci will create a window for each of the selected nodes. These windows will display the "Directory/Full" information about the nodes.
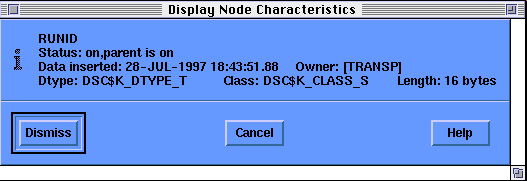
Figure 17. Node Characteristics include both VMS information and TDI types.
2.3.4 Data Modify Data

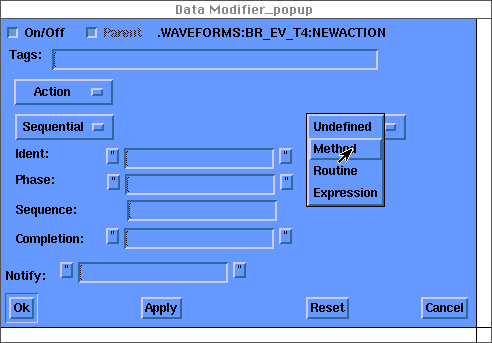
Figure 18. Modifying fields in an Action Node.
Choose Modify Data to change the data in a node. This button will operate on either all of the selected nodes, or the node that was under the mouse when the right button option menu was brought up.
The subsequent dialog boxes allow the user to change the contents of nodes in the tree. Depending on the nodes usage and its current contents, an appropriate dialog box will pop up on the screen.
Use the Menu in the upper right hand side of the dialog to set the data type for the node. Then fill in the appropriate boxes and choose OK or Apply to write the node back into the tree.
To reset to the original contents (before choosing Apply only) use the Reset button.
A window will appear for each of the nodes to be modified. Its dialog box will display the current contents of the node in a format dependent on the usage of the node.
2.3.5 Data Set Default
The set default button sets the current default to the selected node or the node under the mouse if invoked from the right button menu.
If the new default node is not currently 'open', that is its members and children are not displayed, then it is opened. In addition, a box is drawn around it.
Changing the default node changes the meaning of node specifications which do not contain tags. After setting default to the node \TOP.HYBRID.PCS the node specification 'XXX' will refer to the node \TOP.HYBRID.PCS:XXX instead of \TOP:XXX.
2.4 The Customize Menu
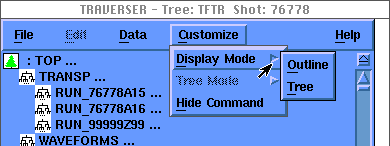
Figure 19. Customize the display of the tree structure here.
2.5 The Help Menu
For an overview of the DECwindows help system, choose On Window from the Using Help menu.
You will see a number of additional topics with information on tasks you can perform using the help system.
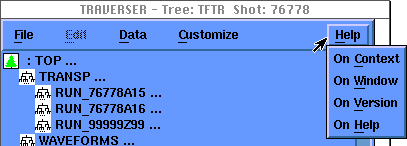
Figure 20. A different format of the text of this document is available on-line.
About TRAVERSER
MDSPlus DECwindows Motif TRAVERSER
Software Version 1.0 field test.